Chapter 4. BitWarden Maintenance
- ZHLBitWarden Module
- (Link to ZHLBitWarden Module)
- This module is REQUIRED for every script mentioned below.
- BitWarden Automated SSL Renewal
- (Link to update-bitwardenSSL.ps1)
- For deployment instructions, follow How-To Automate SSL Renewal
- BitWarden Automated Backups
- (Link to backup-bitwarden.ps1)
- For deployment instructions, follow How-To Automate Backups
- BitWarden Restore From Backup
- (Link to restore-bitwarden.ps1)
- For deployment instructions, follow How-To Restore From a Backup
- BitWarden Automated Updates
- (Link to update-bitwarden.ps1)
- For deployment instructions, follow How-To Automate Software Updates/Upgrades
-
- Requirements
- Step 1. Create Backup Service Account
- Step 2. Create Network Share for Backups
- Step 3. Install AutoFS & Cifs-Utils
- Step 4. Create Authentication File for Network Share
- Step 5. Populate Authentication File
- Step 6. Create AutoFS Mount File
- Step 7. Install PowerShell Backup Script
- Step 8. Create Password File for Encryption
- Step 9. Create Cronjob for Automated Backups
PowerShell is required to run said scripts. Follow these instructions if you do NOT have PowerShell installed on your Virtual Machine. Otherwise, you may skip to 'How-To Install ZHLBitWarden PowerShell Module'
- Update the list of packages:
sudo apt-get -y update
- Install Pre-requisite packages:
sudo apt-get install -y wget apt-transport-https software-properties-common
- Change to your root directory:
cd ~
- Download Microsoft repository GPG keys:
sudo wget -q "https://packages.microsoft.com/config/ubuntu/$(lsb_release -rs)/packages-microsoft-prod.deb"
- Register the Microsoft Repository GPG Keys:
sudo dpkg -i packages-microsoft-prod.deb
- Update the list of packages after adding packages.microsoft.com:
sudo apt-get -y update
- Install PowerShell:
sudo apt-get -y install powershell
The ZHLBitWarden PowerShell module can be installed in the following locations:
| Path |
|---|
| ./ZHLBitWarden.psm1 |
| /$($HOME)/.local/share/powershell/Modules/ZHLBitWarden.psm1 |
| /usr/local/share/powershell/Modules/ZHLBitWarden.psm1 |
I recommend placing the PowerShell module in BitWarden's root directory of '/opt/bitwarden' as the PowerShell scripts assume that is where they'll reside. If the PowerShell module resides within '/opt/bitwarden', it'll be successfully imported.
- Download ZHLBitWarden.psm1 by running the following commands:
cd /opt/bitwarden
sudo wget https://raw.githubusercontent.com/ZacksHomeLab/BitWarden-Scripts/main/modules/ZHLBitWarden/ZHLBitWarden.psm1
- PowerShell Module
ZHLBitWarden.psm1should reside in/opt/bitwardenif you ran the above command.
The PowerShell scripts will utilize your BitWarden's Email Configuration in order to send Emails. So, if you have Email Configured within BitWarden, you can utilize the Email notification functionality within said scripts. All you need to do is add the '-SendEmail' switch and provide an Email Address within -EmailAddresses.
- The Email Settings for BitWarden are in the following location:
/opt/bitwarden/bwdata/env/global.override.env
- The following values are important for your Email Sending:
| Variables |
|---|
| globalSettings__mail__smtp__host |
| globalSettings__mail__smtp__port |
| globalSettings__mail__smtp__ssl |
| globalSettings__mail__smtp__username |
| globalSettings__mail__smtp__password |
There are multiple approaches in sending Email. You can do the following:
- Option 1: Use an account that does NOT have a password (e.g., Shared Mailbox).
- This setup requires more work but doesn't require a password for an email account.
- Option 2: Use an account that has an Email & Password
- This approach requires less tinkering to get working as you do not need to mess with DNS records
I'll demonstrate how to configure both from the OFF365 perspective.
This option will utilize your DNS SPF Records to send Emails on behalf of you. (Note, you may be blocked from doing this in your own home network if you are using this as a self-hosted option on your computer/server. My ISP does NOT allow this.)
- We will utilize a Shared Mailbox to send emails as it does NOT require a license and you do not need to configure any passwords.
- Open Microsoft Exchange Admin Center: https://admin.exchange.microsoft.com/#/mailboxes
- Click 'Add a shared mailbox':
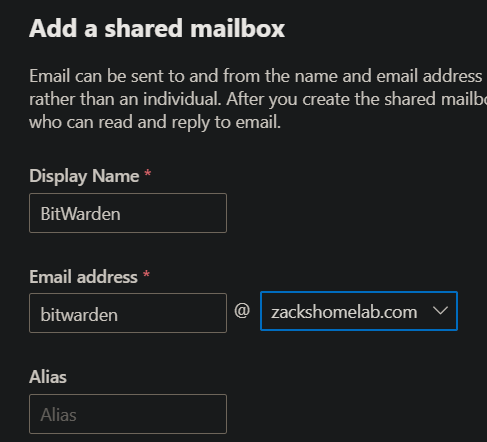
- Give the Mailbox a display name, and Email Address (e.g., BitWarden an bitwarden@mycompany.com)
- Click Create
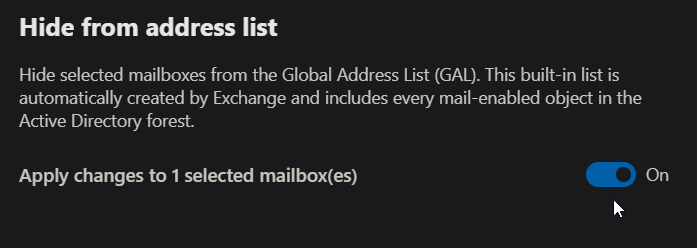
I personally do not like having my Service Inboxes viewable within the Global Address List. If you do not either, follow these steps!
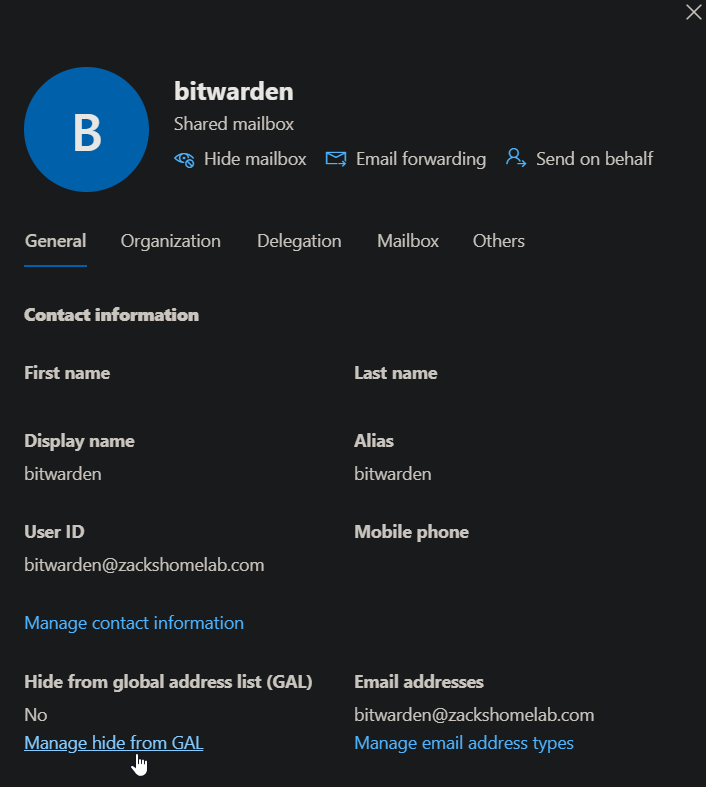
- Once you've created your shared mailbox, select it to open its settings.
- Within the General Tab, click 'Manage hide from GAL':
- Select On and click Save
If you do NOT update your DNS records, your Email will more than likely be marked as Spam. If you have a proper DMARC implementation, you will NOT see these emails at all (assuming the policy is set to 'reject'). So, it's very important to configure your SPF record for your IP Address.
- I use CloudFlare for my external DNS, you may be using something different. However, the approach is the same. You'll need access to your DNS SPF record for your domain.
- What do I need? You'll need your external IP Address. Some companies may have one, two, or a range of IP Addresses that their organization uses. You'll need to add these IP Addresses to your SPF DNS Record in order to authenticate sending Email from your On-Premises network.
- (If you are on your home network, you can simply go to a website like https://ipchicken.com to view your IP)
- Once you have your IP Addresses, browse to your DNS Provider (in my case, that'll be CloudFlare)
- The root TXT record typically contains your SPF record, like so:

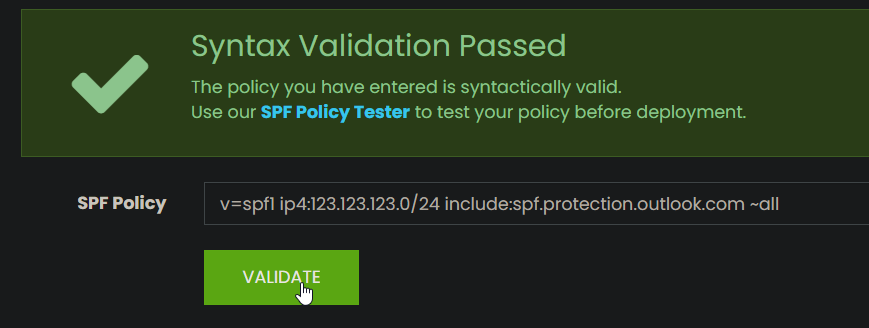
- If I wanted to add a range of IP Addresses to my TXT record, I would create a SPF Record like so:
v=spf1 ip4:123.123.123.0/24 include:spf.protection.outlook.com ~all
The above TXT Record allows IP Addresses 123.123.123.1-123.123.123.254 to send emails on behalf of my domain. NOTE: I highly recommend to copy/paste your TXT record in a syntax checker before pressing Save. A SPF Syntax checker can be found here: https://vamsoft.com/support/tools/spf-syntax-validator
This step assumes you've done the following:
-
Created a Shared Mailbox
-
Added your IP Addresses into your TXT Record
-
The PowerShell Scripts will gather the appropriate SMTP settings found in this file:
/opt/bitwarden/bwdata/env/global.override.env
- You will need to configure the following settings in the above file: Replace 'yourdomain' with your actual domain. Also, if you used a different mailbox other than bitwarden@yourdomain.com, replace that as well.
| Variables | Values |
|---|---|
| globalSettings__mail__smtp__host | yourdomain-com.mail.protection.outlook.com |
| globalSettings__mail__smtp__port | 25 |
| globalSettings__mail__smtp__ssl | false |
| globalSettings__mail__smtp__username | bitwarden@yourdomain.com |
- Open the global environments file and apply your values:
sudo nano /opt/bitwarden/bwdata/env/global.override.env
- Save the file
Email sending may be working at this point. If it is, this step may not be required.
If you have security defaults enabled within your organization, SMTP Auth would be disabled in your organization, and also your newly created mailbox. There are ways to enable SMTP Auth for specific mailboxes but you're bypassing said security defaults.
To utilize security defaults within your organization, a Mail Flow connector may be necessary to send Email from On-premises to Microsoft's servers.
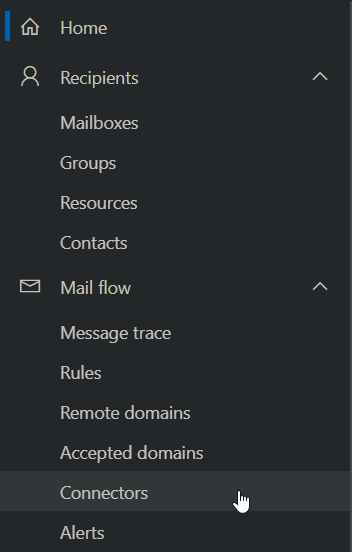
- Log into Exchange Admin Center: https://admin.exchange.microsoft.com/#/
- Expand Mail flow and select Connectors:
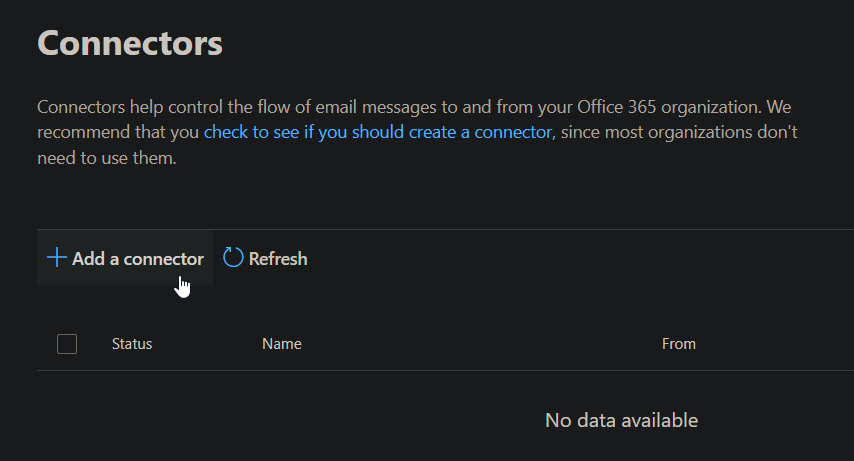
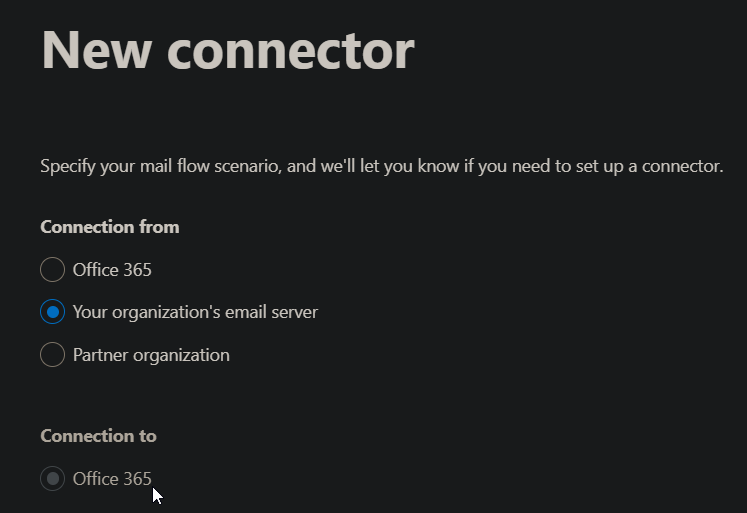
- If there are no connectors listed from your organization's email server to OFF365, Select Add a Connector:
* New Connector
    * Connection from: Your Organization's email server
    * Click Next:
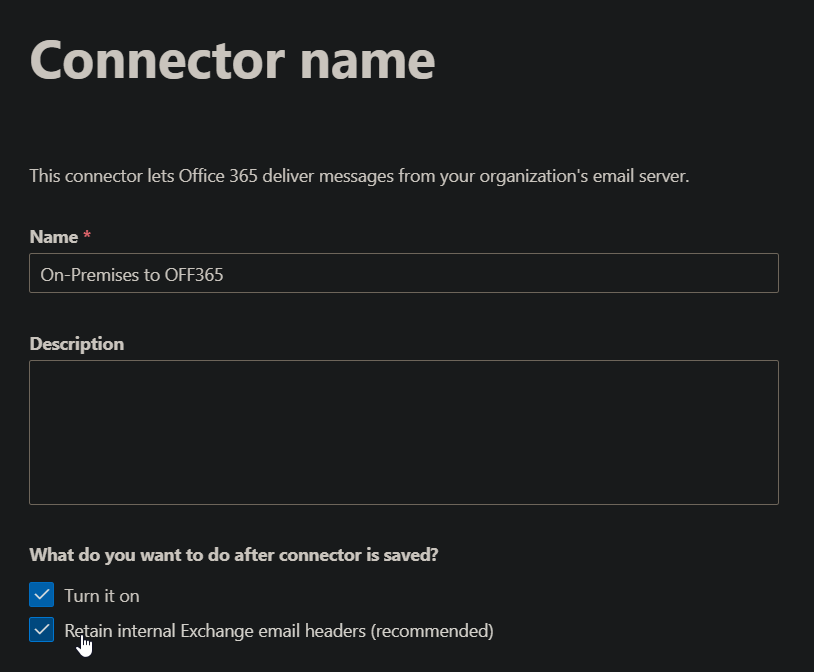
* Connector Name
    * Name: On-Premises to OFF365
    * What do you want to do after connector is saved?
        * Turn it on: Check
        * Retain internal Exchange email headers (recommended): Check
    * Click Next:
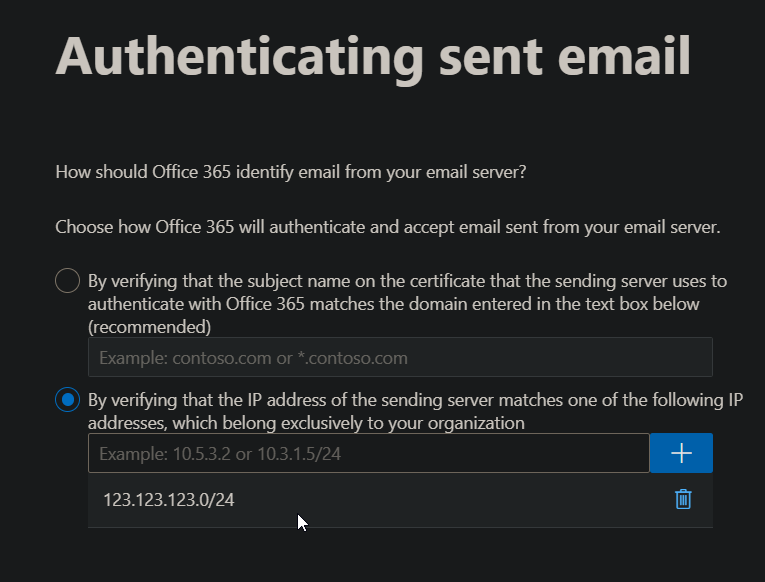
    * Authenticating sent email
        * How should Office 365 identify email from your email server?
        * Select 'By verifying that the IP Address of the sending server matches one of the following IP addresses, which belong exclusively to your organization'. Add the IP Address or IP Addresses from Step 3 into this field and click the blue '+' icon:
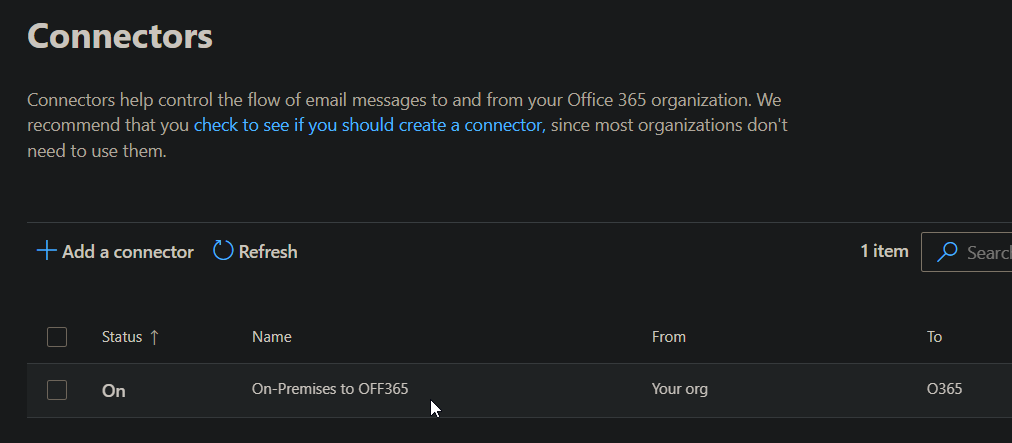
    * Review Connector
        * Click Create Connector
-
You can give your shared mailbox a password for authentication. However, this will vary depending on your setup. Some organizations may have Azure AD Connect deployed on-premises which may not allow Password Sync from OFF365 to On-Premises. In other words, you may need to do this via Active Directory rather than OFF365. As I have password sync enabled for both directions within OFF365 and on-premises, I'm able to achieve this objective through OFF365.
-
Open Exchange Admin Center: https://admin.exchange.microsoft.com/#/
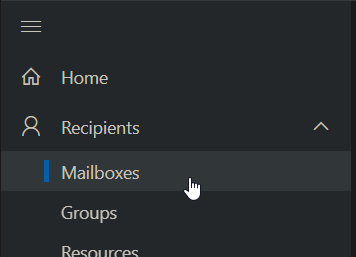
-
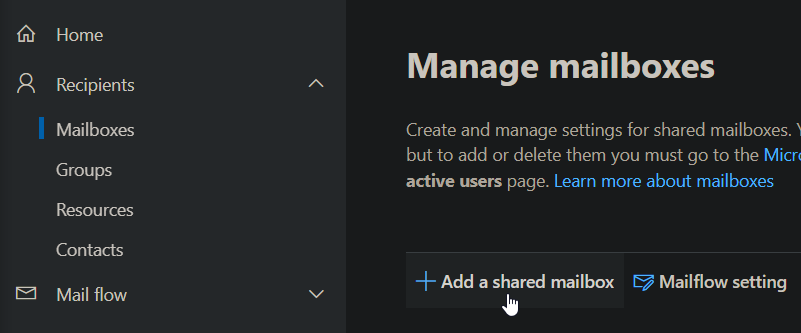
On the left-hand side, expand Recipients and select Mailboxes:
- Click 'Add a shared mailbox':
- Give the Mailbox a display name, and Email Address (e.g., BitWarden an bitwarden@mycompany.com)
- Click Create
This step is optional. Follow Step 2. Hide Mailbox from GAL (Optional). under Option 1. Send Email without Authentication.
NOTE: This will vary upon organization. If you have one-way password synchronization to OFF365, the shared mailbox will need to be created as an Active Directory user within your Active Directory. If you have password synchronization from both OFF365 & Active Directory, you'll be able to set the password in Microsoft Admin Center. In my example, I have password synchronization from OFF365 to On-Premises and vice-versa.
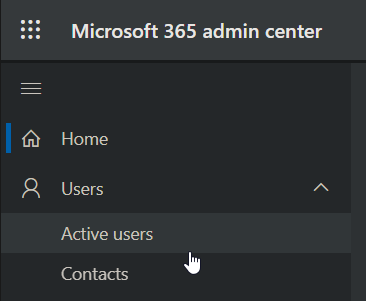
- Log into Microsoft 365 Admin Center: https://admin.microsoft.com/#/homepage
- On the left-hand side, expand Users and select Active Users:
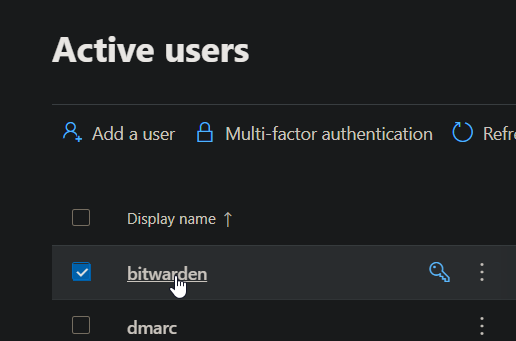
- Left-click the Shared Mailbox you created in Step 1:
- Select Reset password under the Shared Mailbox's display name:
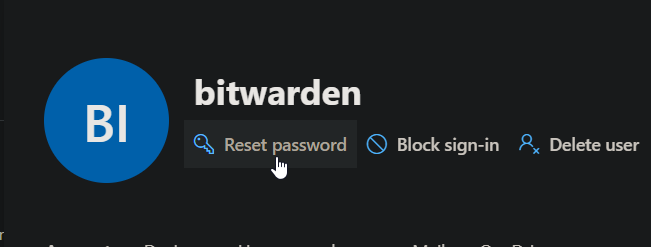
- Select Automatically create a password, uncheck the other options, and click Reset Password:
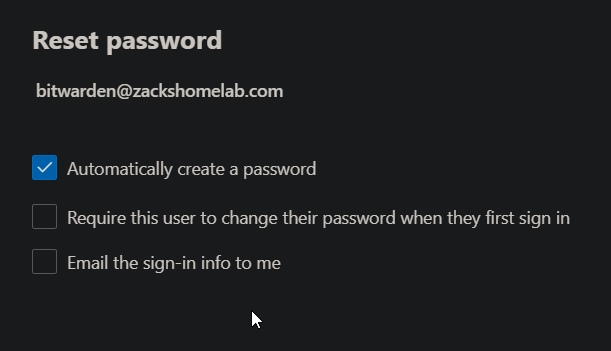
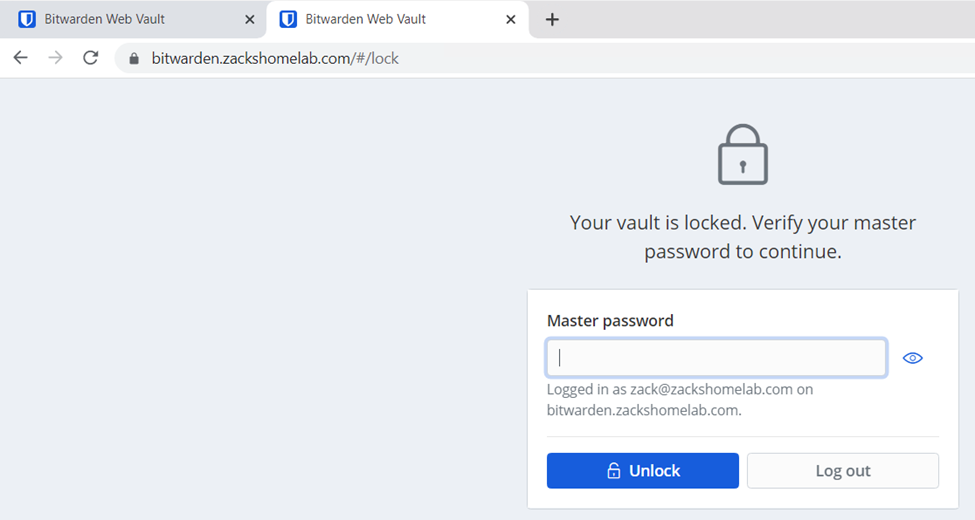
- Save the password within BitWarden's Password Manager and proceed to step 3. NOTE: This password will be used for Step 4.
Follow Step 3. Update External DNS Record. under Option 1. Send Email without Authentication.
This step assumes you've done the following:
-
Created a Shared Mailbox
-
Added your IP Addresses into your TXT Record
-
The PowerShell Scripts will gather the appropriate SMTP settings found in this file:
/opt/bitwarden/bwdata/env/global.override.env
- You will need to update the following settings in the above file:
| Variables | Values |
|---|---|
| globalSettings__mail__smtp__host | smtp.office365.com |
| globalSettings__mail__smtp__port | 587 |
| globalSettings__mail__smtp__ssl | true |
| globalSettings__mail__smtp__username | bitwarden@yourdomain.com |
| globalSettings__mail__smtp__password | YOUR_PASSWORD_HERE |
NOTE: We are using SSL as you'll more than likely get 'StartTLS' errors if not. Replace the username & password with your BitWarden's Email username & password.
If you are getting errors, such as:
Exception: Send-ZHLBWEmail: Failed sending email due to Error in processing. The server response was: 5.7.3 STARTTLS is required
You may need to set globalSettings__mail__smtp__port to 25.
- Open the global environments file and apply your values:
sudo nano /opt/bitwarden/bwdata/env/global.override.env
- Save the file
These instructions assume you've followed these steps:
- How-To Install PWSH
- How-To Install ZHLBitWarden PowerShell Module
- How-To Configure Email Notifications (Optional)
This will vary upon your organization/environment but if you were using Let's Encrypt with an ACME Challenger like myself, you would follow these instructions.
The provided PowerShell script will perform the necessary checks to verify if it has everything needed in order to proceed with the SSL renewal.
- To download
update-bitwardenSSL.ps1to your BitWarden's application directory, run the following commands:
cd /opt/bitwarden
sudo wget https://raw.githubusercontent.com/ZacksHomeLab/BitWarden-Scripts/main/scripts/update-bitwardenSSL.ps1
- Open Crontab by running the following command:
sudo crontab -e
- Add the following line to run the script twice a day at midnight and at noon:
0 0,12 * * * sleep "$(expr "$RANDOM" / 10)"; /usr/bin/pwsh -File "/opt/bitwarden/update-bitwardenSSL.ps1"
- If you followed 'How-To Configure Email Notifications (Optional)', your version of running the script may look like this (with obviously a different Email):
0 0,12 * * * sleep "$(expr "$RANDOM" / 10)"; /usr/bin/pwsh -File "/opt/bitwarden/update-bitwardenSSL.ps1" -SendEmail -EmailAddresses 'zack@zackshomelab.com'
- Save the file
These instructions assume you've followed these steps:
- How-To Install PWSH
- How-To Install ZHLBitWarden PowerShell Module
- How-To Configure Email Notifications (Optional)
This will vary by your organization as some people have a dedicated SAN, NAS, or File Server for backups. In my example, I'll just be demonstrating the overview of how to configure backups. You'll have to adjust the Folder Mapping to your organization's requirements (i.e., I mount the file share to the server to directly copy backups to my file server, your way of mounting may be different than my example).
- NOTE: Step 1 through 6 are examples of 'how' to create a service account, create a network share, and mount the share to Linux. If you know how to do this, you can skip to Step 7 but it is required to get the backup script to work. (Well, you can store the backups locally but that's not a great idea)
- Before we begin, the script that I use for Automated Backups is wrote in PowerShell as PowerShell can be used between different OSes. So, if you deploy BitWarden in Windows, you'll only need to adjust a few functions to get it compatible with Windows.
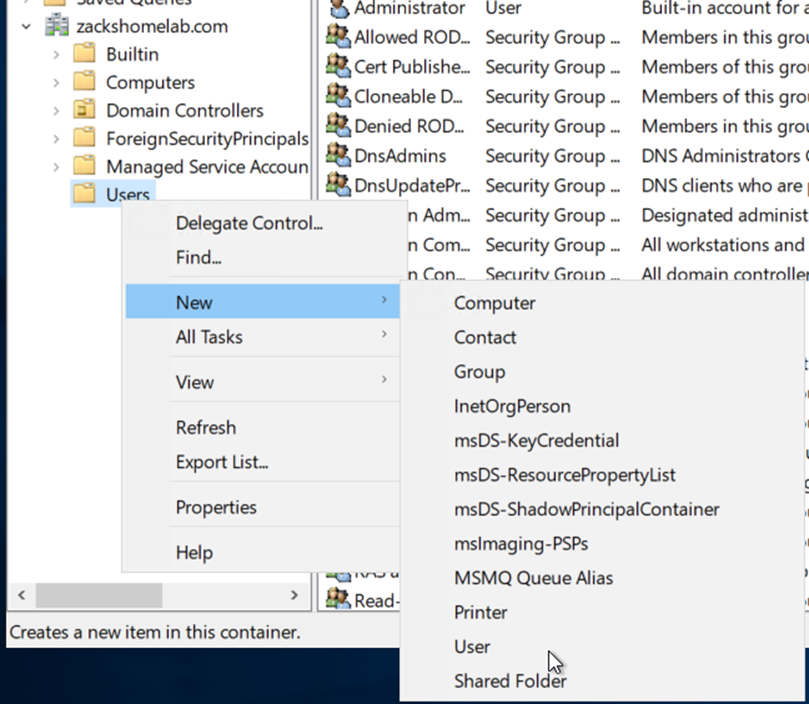
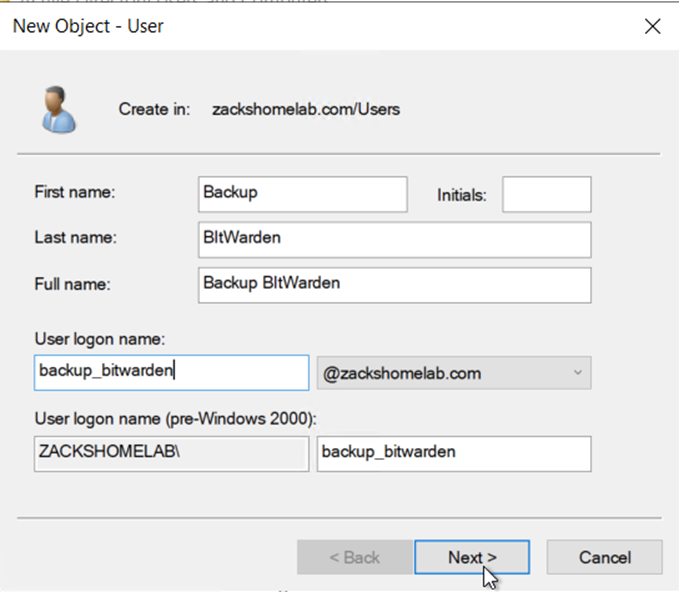
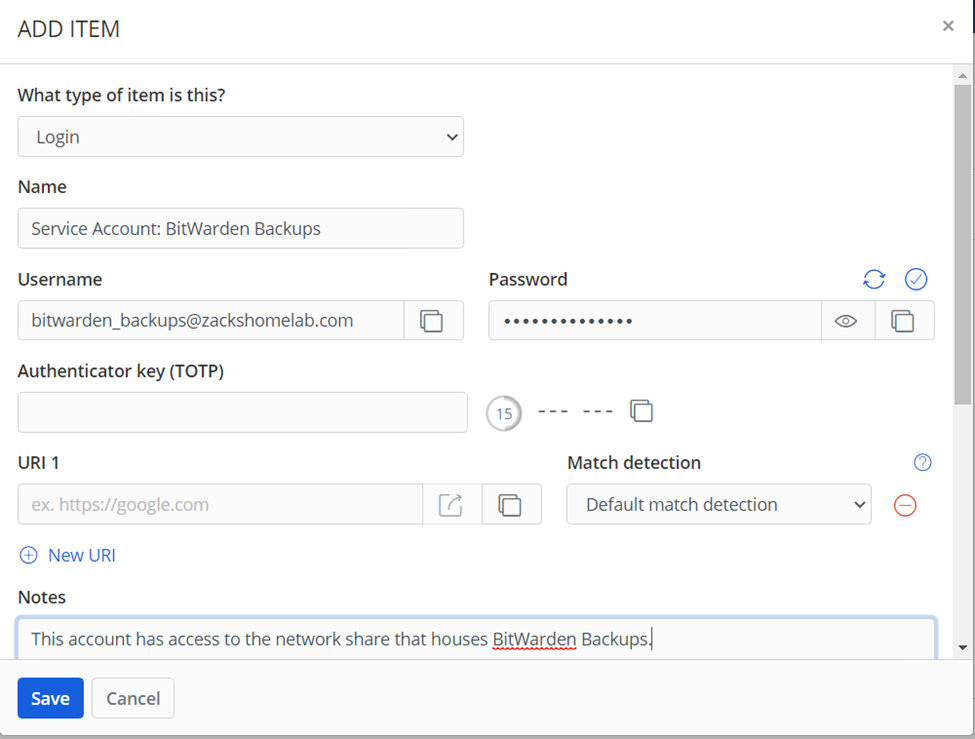
- This will vary on your environment/organization. I tend to create dedicated backup service accounts for each service. So, I'll be creating an Active Directory user named backup_bitwarden which will be used later.
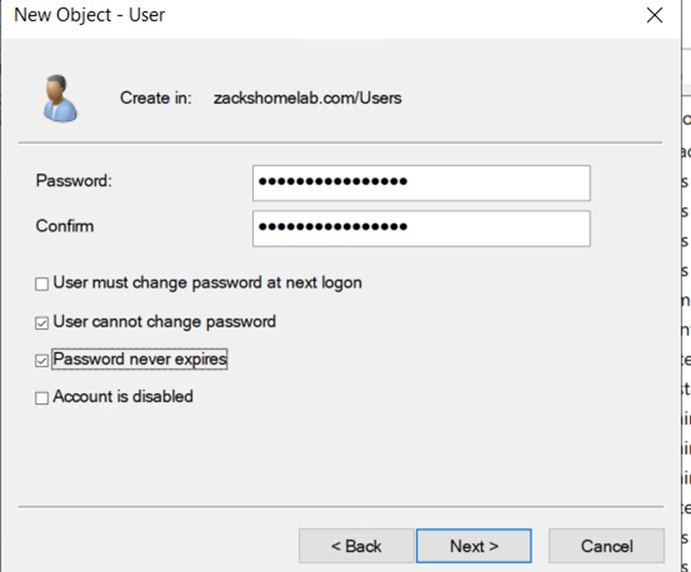
- We can utilize our BitWarden Password Manager now to store the new credentials!
- This will definitely vary by environment/organization. In my example, I'll be creating a network share on backups.zackshomelab.com and give our service account access to said share.
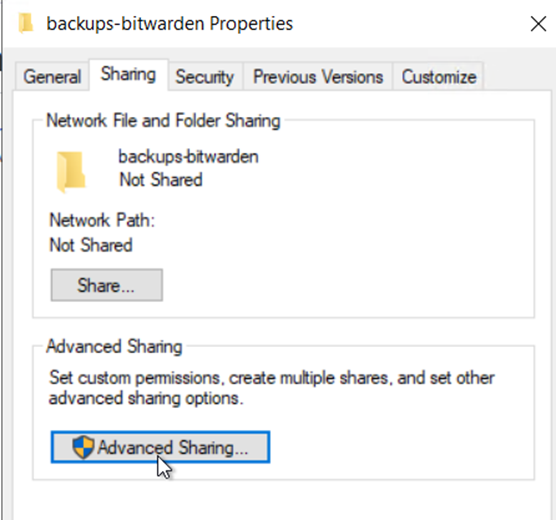
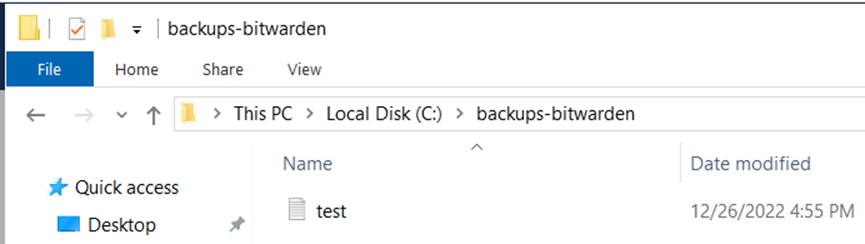
- First, I'll need to create a folder and share it
- Below, I've created a backups-bitwarden folder

- I can share the folder by right-clicking said folder and selecting Properties. Within Properties, browse to the sharing tab and click 'Advanced Sharing'
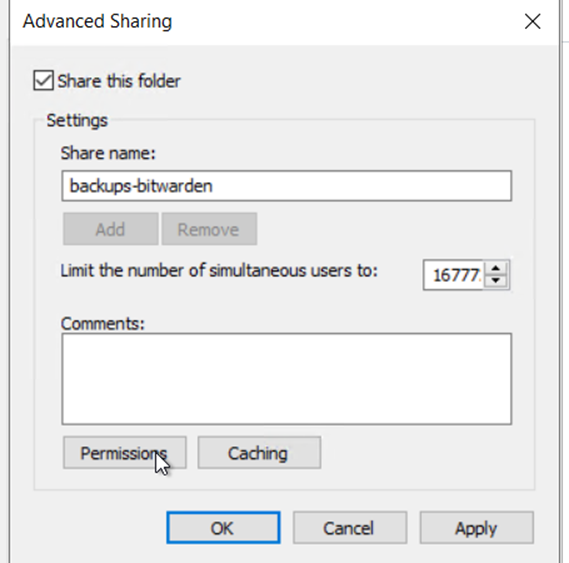
- Check 'Share this folder'
- Share name: leave the default value
- Click Permissions
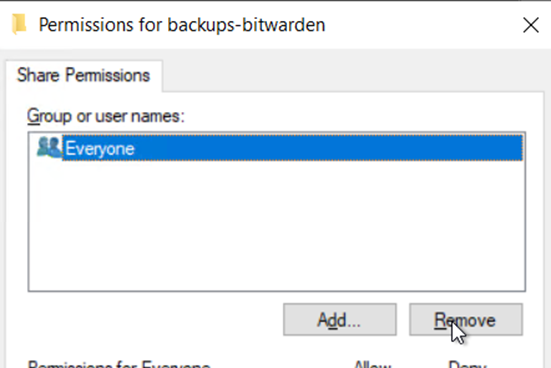
- Remove Everyone
- Give the BitWarden service account full control
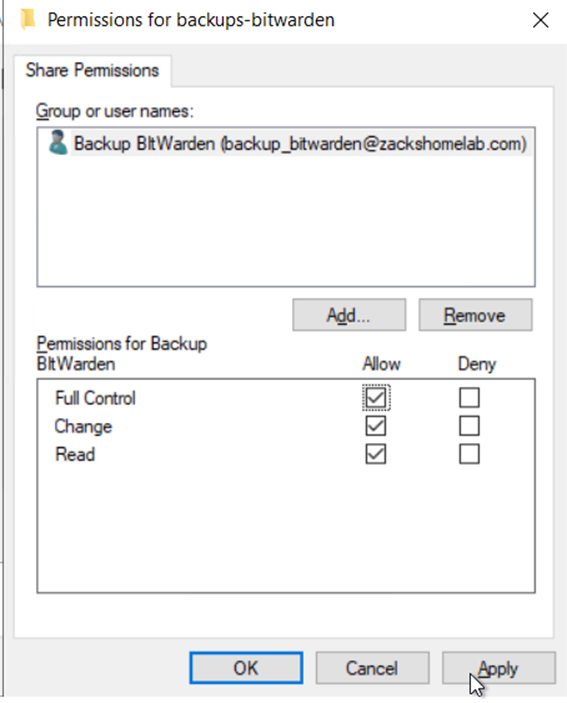
- Click Apply Ok
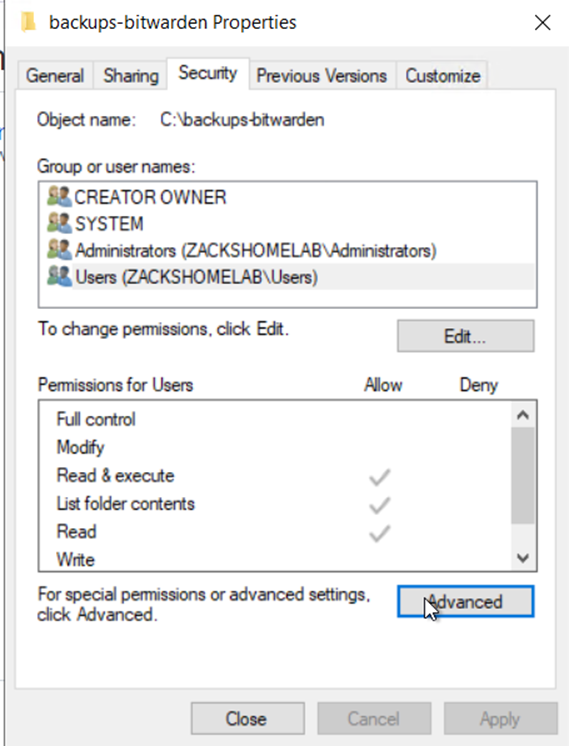
- Click Apply then go to the Security Tab
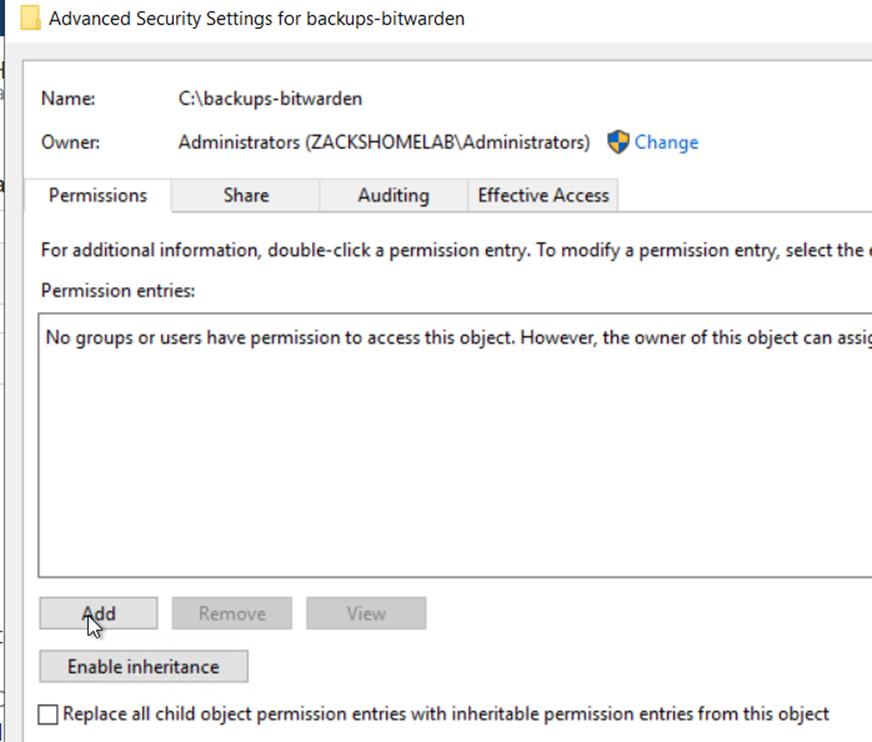
- Click Advanced
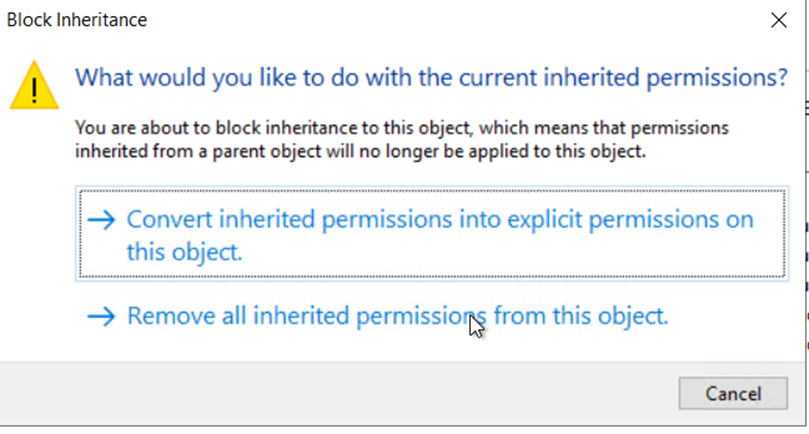
- Click Disable inheritance
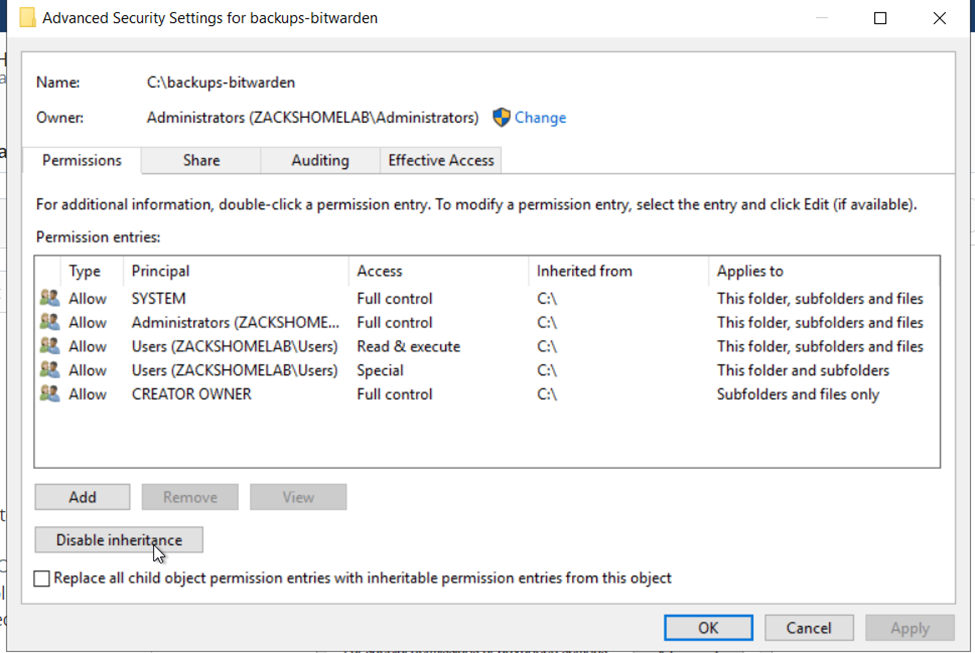
- Click Remove all inherited permissions from this object
- Click Add
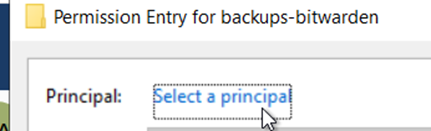
- Click Select a principal
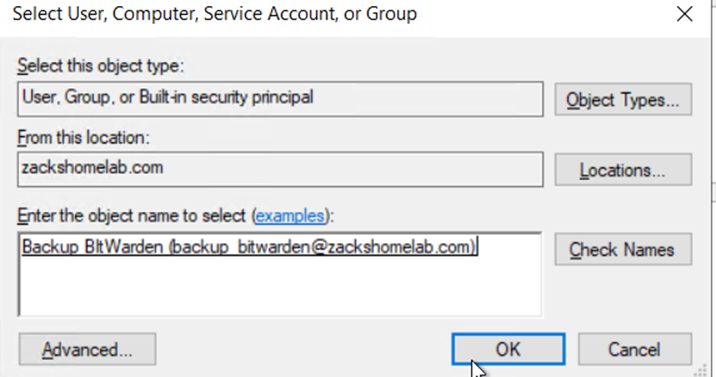
- Select the BitWarden Service Account and click Ok
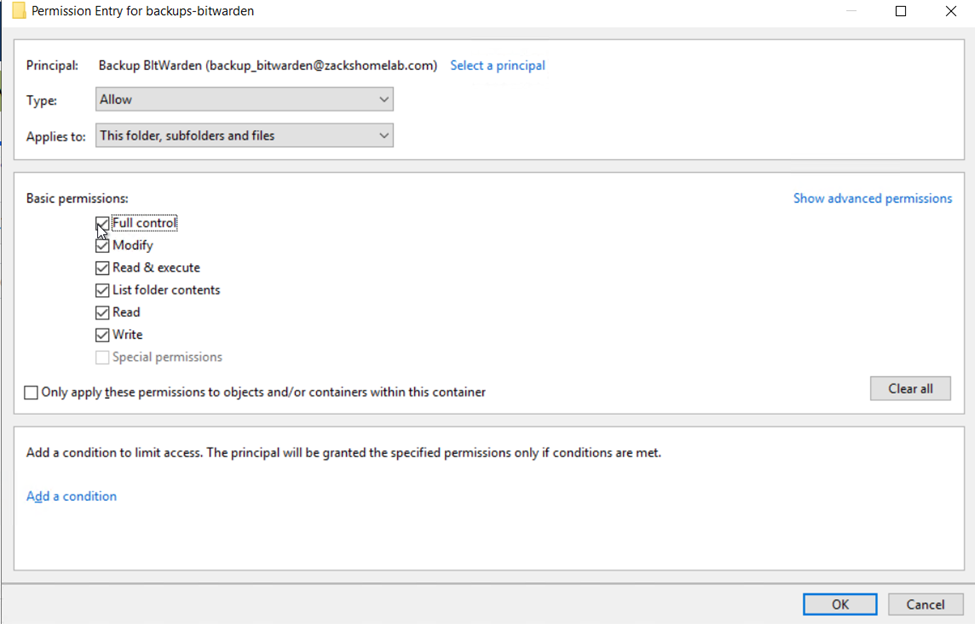
- Check Full Control and click Ok
- Click Save changes
- Depending on your environment, you may want to add more accounts. (not shown is me adding the 'Administrators' group back to the share for access as well)
- AutoFS & Cifs-Utils are the required packages to mount network shares on Ubuntu.
- While SSH'd into your BitWarden server as a sudoer user, install the following packages:
sudo apt-get -y install autofs cifs-utils
- Enable AutoFS on boot:
sudo systemctl enable autofs
- Create a directory that will be used to mount your network share:
sudo mkdir /backups
- Give root ownership of said directory:
sudo chown root:root /backups
- Set appropriate permissions:
sudo chmod 600 /backups
- Your mount point will require permissions. This step will store the credentials of your network share and be used for mounting of said network share.
- Create the authentication file:
sudo touch /etc/auto.backups.auth
- Set the permissions of the file:
sudo chown root:root /etc/auto.backups.auth && sudo chmod 600 /etc/auto.backups.auth
- Open your authentication file that was created:
sudo nano /etc/auto.backups.auth
- Replace the values to match your share/environment:
username=backup_bitwarden
password=Replace_Password_with_yours
domain=zackshomelab.com
- Save the file
- Open the following file (it should be empty):
sudo nano /etc/auto.master.d/backup.autofs
- Paste the following into the file
/- /etc/auto.backups --timeout=300 --ghost
- Save the file
- Now, we'll need to create the /etc/auto.backups file mentioned above:
sudo nano /etc/auto.backups
- Paste the following (you will need to update this to match your environment):
#/backups is the directory we created on our BitWarden server
#  -fstype=cifs,vers=3.0,rw,credentials=/etc/auto.backups.auth is the protocols we're using to connect to our file server while pointing to the credential file we created earlier
# ://backups.zackshomelab.com/backups-bitwarden is our remote endpoint to connect to. Our backups will reside here but we'll be able to access said location via the /backups directory we created earlier
/backups        -fstype=cifs,vers=3.0,rw,credentials=/etc/auto.backups.auth ://backups.zackshomelab.com/backups-bitwarden
- Restart AutoFS:
sudo systemctl restart autofs
- Validate if the connection worked by creating a test.txt file:
sudo touch /backups/test.txt
- Open your file server to see if you can see the test.txt file:
- To download
backup-bitwarden.ps1to your BitWarden's application directory, run the following commands:
cd /opt/bitwarden
sudo wget https://raw.githubusercontent.com/ZacksHomeLab/BitWarden-Scripts/main/scripts/backup-bitwarden.ps1
- The script uses a password file to encrypt the zipped archives.
- Create the password file by running this command:
sudo nano /opt/bitwarden/password_file
- Input the password you'd like to use for encryption and document your password in your BitWarden vault.
- Save the file
- Set the appropriate permissions for said file:
sudo chown root:root /opt/bitwarden/password_file
sudo chmod 600 /opt/bitwarden/password_file
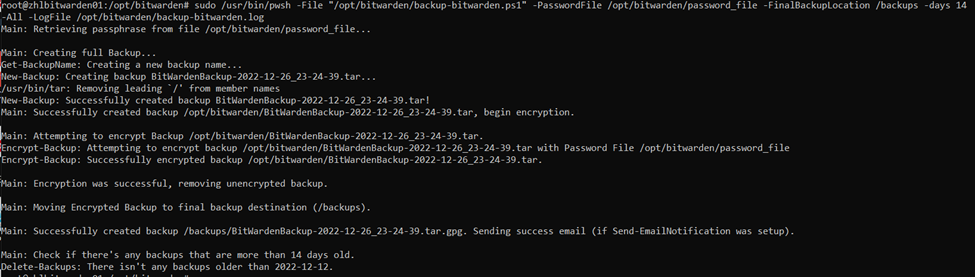
- Now that we have our password file, let's put it to use by testing the PowerShell script, run the following command:
# This will create a full BitWarden Backup using the provided password file, backup location of /backups, with a retention day policy of 14, and with the log file location stored at /opt/bitwarden/backup-bitwarden.log

sudo /usr/bin/pwsh -File "/opt/bitwarden/backup-bitwarden.ps1" -PasswordFile /opt/bitwarden/password_file -FinalBackupLocation /backups -days 14 -All -LogFile /opt/bitwarden/backup-bitwarden.log
- Example output of using the script for me:
- Validation of backups being stored on my file server:

- We've validated the success of the backup script working. It's time to create two cronjobs to autonomously create said backups.
- Open crontab:
sudo crontab -e
- Add the following lines:
# This line performs a full backup at midnight everyday.
# Password file location: /opt/bitwarden/password_file
# Final Backup Location: /backups
# Retention (days): 14
# Log file location: /opt/bitwarden/backup-bitwarden.log
0       0       *       *       *       /usr/bin/pwsh -File "/opt/bitwarden/backup-bitwarden.ps1" -PasswordFile /opt/bitwarden/password_file -FinalBackupLocation /backups -All -days 14 -LogFile /opt/bitwarden/backup-bitwarden.log

# This line performs an incremental backup at the top of the hour except for midnight
# Password file location: /opt/bitwarden/password_file
# Final Backup Location: /backups
# Retention (days): 14
# Log file location: /opt/bitwarden/backup-bitwarden.log

0       1-23       *       *       *       /usr/bin/pwsh -File "/opt/bitwarden/backup-bitwarden.ps1" -PasswordFile /opt/bitwarden/password_file -FinalBackupLocation /backups -Incremental -days 14 -LogFile /opt/bitwarden/backup-bitwarden.log
- If you've followed How-To Configure Email Notifications (Optional) you would add the notifications within the above cronjobs, like so:
# Incremental Backups
0       1-23       *       *       *       /usr/bin/pwsh -File "/opt/bitwarden/backup-bitwarden.ps1" -PasswordFile /opt/bitwarden/password_file -FinalBackupLocation /backups -Incremental -days 14 -LogFile /opt/bitwarden/backup-bitwarden.log -SendEmail -EmailAddresses 'your_email@yourdomain.com'

# Full Backups
0       0       *       *       *       /usr/bin/pwsh -File "/opt/bitwarden/backup-bitwarden.ps1" -PasswordFile /opt/bitwarden/password_file -FinalBackupLocation /backups -All -days 14 -LogFile /opt/bitwarden/backup-bitwarden.log -SendEmail -EmailAddresses 'your_email@yourdomain.com'
- Save the file
These instructions assume you've followed these steps:
- How-To Install PWSH
- How-To Install ZHLBitWarden PowerShell Module
- How-To Configure Email Notifications (Optional)
- This PowerShell script assumes you have the
backup-bitwarden.ps1script up and running. - To download
update-bitwarden.ps1to your BitWarden's application directory, run the following commands:
cd /opt/bitwarden
sudo wget https://raw.githubusercontent.com/ZacksHomeLab/BitWarden-Scripts/main/scripts/update-bitwarden.ps1
- To automatically check/apply updates on a weekly basis, follow these steps
- Open crontab:
sudo crontab -e
- Add the following line:
# This script will run at 4am Every Sunday
# Password file location: /opt/bitwarden/password_file
# Final Backup Location: /backups
# Log File Location: /opt/bitwarden/update-bitwarden.log
0       4       *       *       7      /usr/bin/pwsh -File "/opt/bitwarden/update-bitwarden.ps1" -PasswordFile /opt/bitwarden/password_file -FinalBackupLocation /backups -LogFile /opt/bitwarden/update-bitwarden.log
- If you've followed How-To Configure Email Notifications (Optional) you would add the notifications within the above cronjob, like so:
0 4 * * 7 /usr/bin/pwsh -File "/opt/bitwarden/update-bitwarden.ps1" -PasswordFile /opt/bitwarden/password_file -FinalBackupLocation /backups -LogFile /opt/bitwarden/update-bitwarden.log -SendEmail -EmailAddresses 'your_email@yourdomain.com'
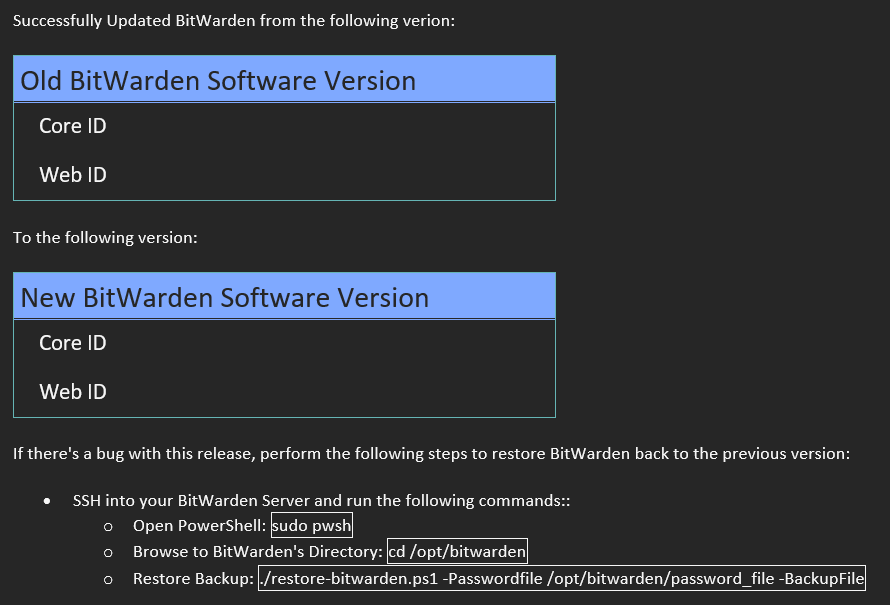
- If you configured your SMTP settings for email notifications, you'll get an email notification like so (this is obviously an email with empty values):
These instructions assume you've followed these steps:
- This PowerShell script assumes you have backup-bitwarden.ps1 script up and running.
- To download
restore-bitwarden.ps1to your BitWarden's application directory, run the following command:
sudo wget https://raw.githubusercontent.com/ZacksHomeLab/BitWarden-Scripts/main/scripts/restore-bitwarden.ps1 -o /opt/bitwarden/restore-bitwarden.ps1
- In this example, I'll restore from an incremental backup:
sudo /usr/bin/pwsh -File "/opt/bitwarden/restore-bitwarden.ps1" -PasswordFile /opt/bitwarden/password_file -BackupFile '/backups/BitWardenBackup-2022-12-26_23-24-39.tar.gpg'
- The output:

(Only showing some of the verbose output below):

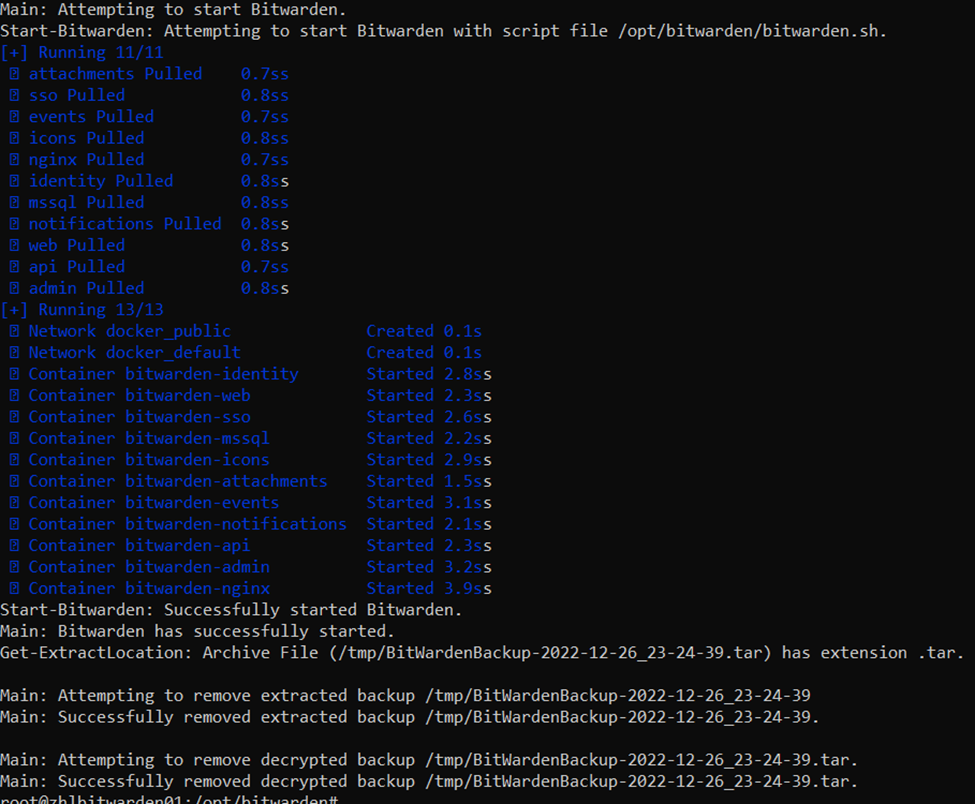
- Verify if BitWarden is back online: